13/ 14 th Jan 2016 - Proofing and registering new stone and fine polishing technique using Water of Ayr stone
Registered new stone using 2 small graining stones to provide external reference points for the paper (as wanted to print proofs on paper bigger than the stone). The stones were then all strapped together to keep their positions relative to each other constant.
Stone registered and ready for proofing
13 proofs were taken using newsprint, kitchen paper and Fabriano Rosepina watercolour paper and non - drying (noir a monter ink). The delicate watery tusches in the foreground printed up quite well but I had over pumiced some of the detail under the eaves on the image and was regretting my heavy handedness somewhat ! I discussed with Serena the various options in developing this image further - namely by adding colour by means of another stone/ photolithoplate/ monoprint or hand tinting with watercolour wash or by adding further tone using another stone or a photolithoplate and then adding watercolour washes. Serena showed me a copy of a wonderful book by John James Audubon 'Birds of America' - which contains 435 reproduced editions of his hand-coloured engravings which were incredible and suggested that it would be interesting to work on another stone to add more tone to the image and then hand tint the combined result.
I thus went on the hunt for a stone large enough to satisfy my requirements! Unfortunately the only one available was a one that had been kindly donated but unfortunately had n't seen the light of day for some time and was going to require some extensive graining!
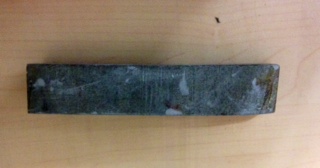
Several hours later .... once the stone was grained, Serena showed us a technique of achieving a very fine polish to the surface of the stone using a Water of Ayr stone. (A hard cylindrical whetstone often used by jewellers and watchmakers - but very difficult to purchase nowadays) She recomended using this between the medium and fine graining sequences when a detailed drawing using fine nibs was planned.
Water of Ayr stone and in use below
Serena demonstrating use of Water of Ayr stone
After polishing the stone was washed, dried and then etched twice with a 1:3 diluted solution of 1:9 concentration acetic acid.
21st /22nd /28th January - Drawing on prepared stone
I wanted to use the newly prepared stone above to add extra tone to the last stone that I had been working on. The image was traced from the first stone onto red oxide paper and transferred on to the newly prepared stone. Areas that I wanted to keep the same from the first stone were masked out on the second stone with gum arabic. I worked with turpsy tusche for the dense black areas and Korns no 4 crayon on a dabber for the lighter tones. The stone was dried, chalked and etched selectively, the dark areas treated with Atzol, mid tones treated with a 50% solution of Atzol and the light very delicate areas treated with home made Gum Arabic solution. The stone was left to rest. Here's the stone before I added the dark areas (this bit saved until last as it is the most messy!
After leaving the stone for a week the drawing still looked really pale where I had used the crayons so Serena suggested rolling it with NAM (non drying ink) slowly and carefully to try and get more of the delicate areas of drawing to take. This we did and the image looked much better on the stone. It was then left for another week to soak in .....
Tuesday, 19 January 2016
Sunday, 10 January 2016
5th, 6th 7th January 2016 - ADDITIONS AND DELETIONS AND PROOFING
Good to be back in the studio after the Christmas break!
Printed several proofs from my small Park Hill III stone using NAM ink and a small glazed roller, experimented with different papers including some samples of velin cube BFK Rives 280gsm paper in grey, tan and cream - i particularly liked the grey and tan papers which gave a nice background hue. Then I discovered some similar Somerset Velvet 300gsm paper in a similar grey colour that LPW stocked so took a few prints from that.
Here is the stone
Heres the print on BFK Rives grey paper
I will experiment with some of these prints at a later date adding colour in the form of monoprints or chine colle.
Returned to my large stone that I had been working on before christmas. The stone was regummed and the drawing washed out. The stone was rolled up with a thin layer of NAM but it was necessary to work on the watery tusche areas quite a bit with the nap roller in order to bring them up.
French chalk was added and then areas of the stone selectively etched. The watery areas in the foreground being quite fragile didnt need any more etching so were just treated with fresh gum arabic solution.
The very dark areas (that were too dark) were treated with Atzol solution (30% nitric acid : 70% Gum Arabic), the rest of the stone was treated with a solution of Atzol diluted by 50%.
The stone was left to rest overnight.
I wanted to add some fine detailed black lines by scratching into the stone with a fine etching needle and then rubbing ink into the grooves. This was done in the following way:
1. Gum and dry stone
2. Fine lines scratched in with an etching needle - (any mistakes made carefully covered over with gum). I added detail in this way to the tiles on some of the walls, railings and areas of wire mesh.
3. NAM ink was mixed with a little turps to create a thick slurry and the ink painted into the grooves. Excess was blotted off with newsprint and the area heated to encorage the ink to penetrate the grooves.
4. French chalk was dusted on to the stone
5. Gum arabic (or water) was dabbed gently into the inked areas which picked up the surplus ink leaving the grooves impregnated with ink.
6. A couple of the lines were not well defined so they were re-scored and ink rubbed in as before.
7. Once the lines were satisfactory, French chalk was dusted on the stone and a thin layer of NAM ink rolled over the stone.
6. The stone was gummed and left to rest overnight
Here is some of the detail that I added by scratching in
The next day I added some white lines by using the same method as above (except omitting to add ink into the grooves!)
I also felt that some of the areas of shading were a little dark (especially those created by the rubbing block) so I softened them by abrading them gently with pumice and scratching back some of the areas gently with a sharp scalpel blade. The edges of the stone were cleaned up using really strong acid.
Certain areas of the stone needed a further etches as the image had been drawn with lots of different materials and the different areas need different amounts of etching. The watery tusche areas didnt require further treatment so they were protected with the fresh gum arabic solution. The very dark areas on the left were a bit too dark so they were treated with a strongly acidic GA solution, the rest of the stone was covered with plain gum.
Here is the finished stone which I will register and proof next week:
Good to be back in the studio after the Christmas break!
Printed several proofs from my small Park Hill III stone using NAM ink and a small glazed roller, experimented with different papers including some samples of velin cube BFK Rives 280gsm paper in grey, tan and cream - i particularly liked the grey and tan papers which gave a nice background hue. Then I discovered some similar Somerset Velvet 300gsm paper in a similar grey colour that LPW stocked so took a few prints from that.
Here is the stone
Heres the print on BFK Rives grey paper
I will experiment with some of these prints at a later date adding colour in the form of monoprints or chine colle.
Returned to my large stone that I had been working on before christmas. The stone was regummed and the drawing washed out. The stone was rolled up with a thin layer of NAM but it was necessary to work on the watery tusche areas quite a bit with the nap roller in order to bring them up.
French chalk was added and then areas of the stone selectively etched. The watery areas in the foreground being quite fragile didnt need any more etching so were just treated with fresh gum arabic solution.
The very dark areas (that were too dark) were treated with Atzol solution (30% nitric acid : 70% Gum Arabic), the rest of the stone was treated with a solution of Atzol diluted by 50%.
The stone was left to rest overnight.
I wanted to add some fine detailed black lines by scratching into the stone with a fine etching needle and then rubbing ink into the grooves. This was done in the following way:
1. Gum and dry stone
2. Fine lines scratched in with an etching needle - (any mistakes made carefully covered over with gum). I added detail in this way to the tiles on some of the walls, railings and areas of wire mesh.
3. NAM ink was mixed with a little turps to create a thick slurry and the ink painted into the grooves. Excess was blotted off with newsprint and the area heated to encorage the ink to penetrate the grooves.
4. French chalk was dusted on to the stone
5. Gum arabic (or water) was dabbed gently into the inked areas which picked up the surplus ink leaving the grooves impregnated with ink.
6. A couple of the lines were not well defined so they were re-scored and ink rubbed in as before.
7. Once the lines were satisfactory, French chalk was dusted on the stone and a thin layer of NAM ink rolled over the stone.
6. The stone was gummed and left to rest overnight
Here is some of the detail that I added by scratching in
The next day I added some white lines by using the same method as above (except omitting to add ink into the grooves!)
I also felt that some of the areas of shading were a little dark (especially those created by the rubbing block) so I softened them by abrading them gently with pumice and scratching back some of the areas gently with a sharp scalpel blade. The edges of the stone were cleaned up using really strong acid.
Certain areas of the stone needed a further etches as the image had been drawn with lots of different materials and the different areas need different amounts of etching. The watery tusche areas didnt require further treatment so they were protected with the fresh gum arabic solution. The very dark areas on the left were a bit too dark so they were treated with a strongly acidic GA solution, the rest of the stone was covered with plain gum.
Here is the finished stone which I will register and proof next week:
Monday, 14 December 2015
Blog 2/12/15 - RESENSITISING /COUNTER ETCHING STONES
Found a new stone to work on ! Previously I found that resensitising the stone initially (especially if I was using masking tapes) gave better results.
To do this:
Wash stone with water
Take a mix of 1:9 acetic acid : water solution and dilute this further with 1:3 parts water
Flush solution over wet stone (should fizz!)
Repeat twice
Rinse off - care being taken not to touch stone
Dry stone
This technique is primarily used for stones which have already been drawn on and that you want to add new work to. It works better with a fresher stone and you often need to use greasier crayons to work with subsequently (eg if you have used a no 4 crayon you will need to use a No. 2) or a turpsy tusche rather than a watery one.
3/12/15 - Worked on new stone- found a good way to create straight lines was to use litho ink and a fine pen nib (as long as there was minimal ink loaded on the nib!). Some marks (to represent distressed tiling created by drawing soft litho crayon on to flocked wall paper and pressing directly on stone. Tried a watery tusche in the foreground - tried drawing over this with a No. 4 litho crayon (Serena said this might come out really dark though) - also gently scratched a little of the watery tusche back.Really dense blacks created by NAM diluted minimally with turps (too much liquid and it had a tendancy to bleed).
10-12 - 15 - worked on new stone - more dark black (diluted NAM ink) added at the top of image
More detail placed on tiles in foreground -using a nib and litho ink shading on dark areas of wall to create shadow with a litho crayon.
Serena mentioned that it would be good to se a watery etch used on the watery washes in the foreground- She also suggested that instead of using our usual gum arabic solution we made our own as it is less acidic as it doesnt contain the preservatives that shop bought solutions do. We will do this and the water etching next week.
Heres where I am up to with the stone at the moment
16-12-2015 - MAKING FRESH GUM ARABIC SOLUTION
Finished drawing on stone (although I intend to add to it by scratching in fine black lines after the second etch) and left to rest for the remainder of day. Gently poured a fresh solution of Gum arabic over the drawing and lightly brushed over the solution to cover the stone thinly. Excess was removed with gentle dabbing and the surface buffed and dried.
The fresh gum arabic solution was made as follows:
1. Pour approx 300ml water into a wide necked jar
2. Add a few drops of Jeyes solution (phenol (aka -carbolic acid)- has antisceptic properties and preserves the solution)
3. Place a fist full of gum arabic crystals inside an old pop sock and suspend the sock from a wooden barbecue skewer which is placed over the rim of the jar suspending the Gum Arabic crystals in the weak phenol solution.Leave 24 hours
(This photo wasnt taken when we made the solution but after we'd used half of it! - so the crystals should be suspended in the water - but you get the idea!)
17-12-2015 - ETCH FOR WATERY TUSCHES
As the watery tusches are very delicate and fragile they would be damaged with our usual gum arabic ethches so a very weak acid solution was made to etch these areas.
Water Etch - (98 % water :2% nitric acid solution) -Used for delicate watery washes and mixed drawings
1. Wet stone with water
2. Flush over weak acid solution for maximum of 30 seconds -(stone should sparkle slightly)
3. Wash with water
4. Dry stone with hair dryer (dont over do)
5. Gently cover with plain (fresh if possible) gum arabic - taking care as drawing really fragile.
6. Dry with hair dryer
7. Leave to rest
Found a new stone to work on ! Previously I found that resensitising the stone initially (especially if I was using masking tapes) gave better results.
To do this:
Wash stone with water
Take a mix of 1:9 acetic acid : water solution and dilute this further with 1:3 parts water
Flush solution over wet stone (should fizz!)
Repeat twice
Rinse off - care being taken not to touch stone
Dry stone
This technique is primarily used for stones which have already been drawn on and that you want to add new work to. It works better with a fresher stone and you often need to use greasier crayons to work with subsequently (eg if you have used a no 4 crayon you will need to use a No. 2) or a turpsy tusche rather than a watery one.
3/12/15 - Worked on new stone- found a good way to create straight lines was to use litho ink and a fine pen nib (as long as there was minimal ink loaded on the nib!). Some marks (to represent distressed tiling created by drawing soft litho crayon on to flocked wall paper and pressing directly on stone. Tried a watery tusche in the foreground - tried drawing over this with a No. 4 litho crayon (Serena said this might come out really dark though) - also gently scratched a little of the watery tusche back.Really dense blacks created by NAM diluted minimally with turps (too much liquid and it had a tendancy to bleed).
10-12 - 15 - worked on new stone - more dark black (diluted NAM ink) added at the top of image
More detail placed on tiles in foreground -using a nib and litho ink shading on dark areas of wall to create shadow with a litho crayon.
Serena mentioned that it would be good to se a watery etch used on the watery washes in the foreground- She also suggested that instead of using our usual gum arabic solution we made our own as it is less acidic as it doesnt contain the preservatives that shop bought solutions do. We will do this and the water etching next week.
Heres where I am up to with the stone at the moment
16-12-2015 - MAKING FRESH GUM ARABIC SOLUTION
Finished drawing on stone (although I intend to add to it by scratching in fine black lines after the second etch) and left to rest for the remainder of day. Gently poured a fresh solution of Gum arabic over the drawing and lightly brushed over the solution to cover the stone thinly. Excess was removed with gentle dabbing and the surface buffed and dried.
The fresh gum arabic solution was made as follows:
1. Pour approx 300ml water into a wide necked jar
2. Add a few drops of Jeyes solution (phenol (aka -carbolic acid)- has antisceptic properties and preserves the solution)
3. Place a fist full of gum arabic crystals inside an old pop sock and suspend the sock from a wooden barbecue skewer which is placed over the rim of the jar suspending the Gum Arabic crystals in the weak phenol solution.Leave 24 hours
(This photo wasnt taken when we made the solution but after we'd used half of it! - so the crystals should be suspended in the water - but you get the idea!)
17-12-2015 - ETCH FOR WATERY TUSCHES
As the watery tusches are very delicate and fragile they would be damaged with our usual gum arabic ethches so a very weak acid solution was made to etch these areas.
Water Etch - (98 % water :2% nitric acid solution) -Used for delicate watery washes and mixed drawings
1. Wet stone with water
2. Flush over weak acid solution for maximum of 30 seconds -(stone should sparkle slightly)
3. Wash with water
4. Dry stone with hair dryer (dont over do)
5. Gently cover with plain (fresh if possible) gum arabic - taking care as drawing really fragile.
6. Dry with hair dryer
7. Leave to rest
Monday, 23 November 2015
9/11/15 - SETTING UP EXHIBITION AT LCB
Nina and I set up our exhibition 'Molotovs to Modernism' at the LCB depot documenting the first 6 months of our Fellowship. Its a lovely light space and just the right size for two!
Here are some snaps of the work in situ
The gallery from the outside
My work including a couple of paintings which relate to the lithographs I have been working on
Nina's lively lithographs
The exhibition runs until 23/12/15
11/11/15
First day printing in our fabulous new premises at LPW!
Loads of light and space.
Printed 8 of the Park Hill large stone on Fabriano white and 2 on Japanese paper.
Heres our new litho press kindly donated by a lovely lady from Wirksworth.
And heres out trusty old litho press brought from St Stephens road.
The newly acquired press isnt up and running yet so I printed on our old one. 8 prints of the Park Hill large stone taken on Fabriano white and 2 on Japanese paper.
18/11/15
Using the old press - printed an edition of 6 of the small Park Hill stone on Fabriano Rosepina Cream and a further 6 on white using crayon black and NAM inks. The stone was darkening up a bit so I treated it with a solution of Atzol at the end.
Worked a little on new small stone (Park Hill 3) -Used masking tapes, NAM dissolved in turps to get the intense blacks, rubbing blocks and a tusche dissolved in water.
In the evening we had an excellent Workers Unite session. A social event (not a trades union meeting which was what I originally presumed!) whereby members of LPW get together with plenty of wine and crisps to discuss their arts practice and what they have been up to. We also had a visit from Ruth Sumner, Senior Lecturer in Fine Art at DMU who kindly gave us a one to one crit of our work which I found particlarly useful.
Nina and I set up our exhibition 'Molotovs to Modernism' at the LCB depot documenting the first 6 months of our Fellowship. Its a lovely light space and just the right size for two!
Here are some snaps of the work in situ
The gallery from the outside
My work including a couple of paintings which relate to the lithographs I have been working on
Nina's lively lithographs
The exhibition runs until 23/12/15
11/11/15
First day printing in our fabulous new premises at LPW!
Loads of light and space.
Printed 8 of the Park Hill large stone on Fabriano white and 2 on Japanese paper.
Heres our new litho press kindly donated by a lovely lady from Wirksworth.
And heres out trusty old litho press brought from St Stephens road.
The newly acquired press isnt up and running yet so I printed on our old one. 8 prints of the Park Hill large stone taken on Fabriano white and 2 on Japanese paper.
18/11/15
Using the old press - printed an edition of 6 of the small Park Hill stone on Fabriano Rosepina Cream and a further 6 on white using crayon black and NAM inks. The stone was darkening up a bit so I treated it with a solution of Atzol at the end.
Worked a little on new small stone (Park Hill 3) -Used masking tapes, NAM dissolved in turps to get the intense blacks, rubbing blocks and a tusche dissolved in water.
In the evening we had an excellent Workers Unite session. A social event (not a trades union meeting which was what I originally presumed!) whereby members of LPW get together with plenty of wine and crisps to discuss their arts practice and what they have been up to. We also had a visit from Ruth Sumner, Senior Lecturer in Fine Art at DMU who kindly gave us a one to one crit of our work which I found particlarly useful.
Sunday, 27 September 2015
Blog 16/9/15 and 17/9/15 -VISITING LCB EXHIBITION SPACE
Met with Katharine, Serena and Nina - we have decided to hold an exhibition of our lithography work so far charting our progress - opening November 11th - December 23rd at the LCB depot in Leicester. So that's exciting ! Slightly worried re the lack of work that I've got to display compared to my fellow fellow Nina but I'm sure it will be fine! We visited the exhibition space on the way back to the station - its superb - not too big and really light.
Gallery space at LCB
Blog 22/9/15 and 23/9/2015
After seeing the space Nina started to work on a stone to make a poster to advertise the event
The stone was left to rest overnight and the next day we printed it up
I also prepared 2 photo litho plates for my park hill stone as a means of adding colour to the prints- sky, concrete balustrades and windows were traced from one of the prints that I had already taken onto 2 large sheets of draughting paper using black marker pen and acrylic paint. In the dark room the draughting paper was attached to 2 separate photolithography plates using scotch tape - they were then transferred to the photoexposure machine and exposed for 12 units. The exposed plates were then taken back to the dark room, the draughting sheets were removed and the plates dampened with developing solution for 3 minutes until the image started to appear. The plates were then washed with water and dried . Gum Arabic solution was then placed thinly on each plate and then dried with a hair dryer. Each plate was then protected with a layer of tissue paper so that they wouldn't get scratched.
Here are the plates - unfortunately there wasnt enough time to print from them so thats for another time (in about 6 weeks!) as Leicester Print Workshop is moving premises and will be until November 4th.
Photo litho plates produced (which can be inked as a monoprint to add colour tints to existing prints - top one will add colour the concrete balustrade areas, the bottom one will add colour in areas of the windows and sky (images reversed but will be the right way round when printed)
Met with Katharine, Serena and Nina - we have decided to hold an exhibition of our lithography work so far charting our progress - opening November 11th - December 23rd at the LCB depot in Leicester. So that's exciting ! Slightly worried re the lack of work that I've got to display compared to my fellow fellow Nina but I'm sure it will be fine! We visited the exhibition space on the way back to the station - its superb - not too big and really light.
Gallery space at LCB
Blog 22/9/15 and 23/9/2015
After seeing the space Nina started to work on a stone to make a poster to advertise the event
The stone was left to rest overnight and the next day we printed it up
I also prepared 2 photo litho plates for my park hill stone as a means of adding colour to the prints- sky, concrete balustrades and windows were traced from one of the prints that I had already taken onto 2 large sheets of draughting paper using black marker pen and acrylic paint. In the dark room the draughting paper was attached to 2 separate photolithography plates using scotch tape - they were then transferred to the photoexposure machine and exposed for 12 units. The exposed plates were then taken back to the dark room, the draughting sheets were removed and the plates dampened with developing solution for 3 minutes until the image started to appear. The plates were then washed with water and dried . Gum Arabic solution was then placed thinly on each plate and then dried with a hair dryer. Each plate was then protected with a layer of tissue paper so that they wouldn't get scratched.
Here are the plates - unfortunately there wasnt enough time to print from them so thats for another time (in about 6 weeks!) as Leicester Print Workshop is moving premises and will be until November 4th.
Photo litho plates produced (which can be inked as a monoprint to add colour tints to existing prints - top one will add colour the concrete balustrade areas, the bottom one will add colour in areas of the windows and sky (images reversed but will be the right way round when printed)
Monday, 14 September 2015
26th August 2015
MORE CHINE COLLE ADDITIONS USING MARBLED AND AEROSOL SPRAY PAINTED PAPER
I carried on cutting out more marbled paper shapes and pulled more prints. I used a combination of 50% crayon black : 50% noir a monter with a dash of crimson red and the nap roller .
The stone was becoming quite dark in places so I selectively pumiced and etched the really dark areas with atzol solution and then applied French chalk and gum arabic
When I compared the prints that were printed with noir a monter ink alone with that of the combination of inks (crayon black and noir a monter) the noir a monter alone produced a softer lighter print - the combo was really good for dense velvety blacks - Discussed this with Serena -a possibility for the next stone might be to use an image that takes advantage of both soft and dense hues of each of the inks and use 2 stones to print on to gain the advantages of both.
When I got home I aerosol spray painted some blank sheets of paper in various colours (buff pink/ sand/ terracotta) with the idea of using these as chine colle instead of the marbled paper.
These were also printed as before.
27th August 2015/ 2nd September 2015 - MAKING GUM ARABIC TRANSFER PAPER
Serena also showed us how to make gum Arabic paper to use for transferring textures and drawings to stones .A sheet of cartridge paper was gently blotted with a damp sponge and placed on a board. Watercolour adhesive strip tape was cut to seal the paper to the board. Once the paper had dried a diluted solution of gum Arabic was brushed evenly on to the paper - care being taken not to incorporate brush marks or stray bristles from the brush. This was left to dry and another thin coat applied.
Gummed cartridge paper stretched and covered with gum arabic solution to make transfer paper
We were interested in adding texture to the transfer paper so the paper was divided into four and different additives dissolved into the gum arabic to give texture.
A teaspoon of pumice powder was added to one batch of the gum Arabic solution, a teaspoon of carborundum grit was added to another and a teaspoon of whiting to another. These 3 solutions were each painted onto a quarter of the prepared paper. One quarter of the board was left with just plain gum arabic solution on it.
Blog 3/9
Carried on taking more prints with chine colle but this time tried a different paper (heritage white) - nice paper -Used more crayon black in the combined ink mix which gave a really dense black print which I liked - also noticed a few extraneous blobs appearing on the prints - Serena reckoned these were due to bits of leather off the handles of the nap roller being incorporated on the stone and printing - need to watch that ...
Next time -? Mono print using paper prepared a few weeks ago or photolitho plate?
MORE CHINE COLLE ADDITIONS USING MARBLED AND AEROSOL SPRAY PAINTED PAPER
I carried on cutting out more marbled paper shapes and pulled more prints. I used a combination of 50% crayon black : 50% noir a monter with a dash of crimson red and the nap roller .
The stone was becoming quite dark in places so I selectively pumiced and etched the really dark areas with atzol solution and then applied French chalk and gum arabic
When I compared the prints that were printed with noir a monter ink alone with that of the combination of inks (crayon black and noir a monter) the noir a monter alone produced a softer lighter print - the combo was really good for dense velvety blacks - Discussed this with Serena -a possibility for the next stone might be to use an image that takes advantage of both soft and dense hues of each of the inks and use 2 stones to print on to gain the advantages of both.
When I got home I aerosol spray painted some blank sheets of paper in various colours (buff pink/ sand/ terracotta) with the idea of using these as chine colle instead of the marbled paper.
These were also printed as before.
27th August 2015/ 2nd September 2015 - MAKING GUM ARABIC TRANSFER PAPER
Serena also showed us how to make gum Arabic paper to use for transferring textures and drawings to stones .A sheet of cartridge paper was gently blotted with a damp sponge and placed on a board. Watercolour adhesive strip tape was cut to seal the paper to the board. Once the paper had dried a diluted solution of gum Arabic was brushed evenly on to the paper - care being taken not to incorporate brush marks or stray bristles from the brush. This was left to dry and another thin coat applied.
Gummed cartridge paper stretched and covered with gum arabic solution to make transfer paper
We were interested in adding texture to the transfer paper so the paper was divided into four and different additives dissolved into the gum arabic to give texture.
A teaspoon of pumice powder was added to one batch of the gum Arabic solution, a teaspoon of carborundum grit was added to another and a teaspoon of whiting to another. These 3 solutions were each painted onto a quarter of the prepared paper. One quarter of the board was left with just plain gum arabic solution on it.
Blog 3/9
Carried on taking more prints with chine colle but this time tried a different paper (heritage white) - nice paper -Used more crayon black in the combined ink mix which gave a really dense black print which I liked - also noticed a few extraneous blobs appearing on the prints - Serena reckoned these were due to bits of leather off the handles of the nap roller being incorporated on the stone and printing - need to watch that ...
Next time -? Mono print using paper prepared a few weeks ago or photolitho plate?
Tuesday, 1 September 2015
20/8/15 -CHINE COLLE WITH MARBLED PAPER
Whilst on holiday in Cornwall I came across some beautiful hand marbled pink and grey paper in a second hand book shop. I thought this woud be interesting to use as chine colle as the colours reminded me of the brick work of Park Hill. (Chine colle is a printmaking technique whereby paper of a different colour or texture is adhered to the overall piece. It usually involves sticking precut shapes of paper to the heavier support paper in the printing process.) I cut squares of the marbled paper to fit the bricked up areas of the print using carbon paper on one of my earlier prints to trace the shapes accurately.
The stone was inked - (using just Noir a monter ink and the squares of cut marbled paper were placed image side down on the stone and pritt stick glue placed on the non image side of the marbled paper-(see below)
A dampened sheet of watercolour paper was carefully placed on top of the glued cut shapes and then the stone run was through the litho press - Heres the print! (I also added some blue and gold marbled paper on the left hand side of the print)
It seemed to worked quite well and I thought I would try this again next week but using a different ink combination As the noir a monter alone didnt give the lovely velvety black that I got when I added crayon black ink to the mix,
Serena also showed me another way of adding colour to the prints. A large piece of cartridge paper was coated thinly with water based varnish on both sides - care being taken not to incorporate brush strokes. Small squares were then cut up as in the chine colle cut outs above and then inked and then placed ink side up on paper to accept the print.
I didn't have time to try this method out but will have a go another time!
Whilst on holiday in Cornwall I came across some beautiful hand marbled pink and grey paper in a second hand book shop. I thought this woud be interesting to use as chine colle as the colours reminded me of the brick work of Park Hill. (Chine colle is a printmaking technique whereby paper of a different colour or texture is adhered to the overall piece. It usually involves sticking precut shapes of paper to the heavier support paper in the printing process.) I cut squares of the marbled paper to fit the bricked up areas of the print using carbon paper on one of my earlier prints to trace the shapes accurately.
The stone was inked - (using just Noir a monter ink and the squares of cut marbled paper were placed image side down on the stone and pritt stick glue placed on the non image side of the marbled paper-(see below)
A dampened sheet of watercolour paper was carefully placed on top of the glued cut shapes and then the stone run was through the litho press - Heres the print! (I also added some blue and gold marbled paper on the left hand side of the print)
It seemed to worked quite well and I thought I would try this again next week but using a different ink combination As the noir a monter alone didnt give the lovely velvety black that I got when I added crayon black ink to the mix,
Serena also showed me another way of adding colour to the prints. A large piece of cartridge paper was coated thinly with water based varnish on both sides - care being taken not to incorporate brush strokes. Small squares were then cut up as in the chine colle cut outs above and then inked and then placed ink side up on paper to accept the print.
I didn't have time to try this method out but will have a go another time!
Subscribe to:
Posts (Atom)


